TODO:
- Make a new github user for personal use, check what the process is like to add to the WLI org or whatever
- Markdown tutorial (basics!)
This site is made with Hugo, a static website generator thingy. While this grants some very tangible benefits (cheap, easy to render) updating it is a bit more technical than something like a wiki. Fortunately there are some nice tools to assist with the process.
There are two methods to editing the docs, both involving github.
Github
Firstly, you’ll need a github account - I know, annoying, but it is more or less the easiest way for multiple users to edit the site with authentication. Once you have an account, contact me (John!) to get access to the WLI organization.
Once you have an account (and have been added to the org!) you can click on the “Edit this page” link at the top of every documentation page.
Markdown
Documentation pages are written in “Markdown” - a super simple markup language a ton of programs use.
Here is a handy cheat sheet, but I’ll post a few of the most useful tricks here:
| Syntax | Description |
|---|---|
| Header | # H1 ## H2 ### H3 |
| Bold | **bold text** |
| Italics | *italics text* |
Unordered list:

- First item
- Second item
- Third item
You can make callouts too. > **Cool** *call* out looks like:
Cool call out
✨Emoji are supported!✨
Images
Images must live in the folder the page lives in. This looks something like:
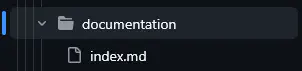
docs/
├── intro/
│   └── documentation/
│      ├── index.md
│      └── MyCoolImage.png
Uploading an image on GitHub is a lil annoying, unfortunately.
- On the left side of the GitHub page, click on the folder you want to put the image
- Next, on the top right side, click Add file > Upload files.
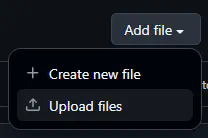
- You then can drag in your image to the uploader, then commit the “changes” to the repository.
- Your image will now exist on the repo and is ready to be linked to in the page.
Images can then be entered into the page with . I’ve defaulted them to render centered with italic caption text below. Captions are optional - alt text is technically non-optional but I’m not gonna worry about screen readers too much.
Don’t worry about optimizing your images - Hugo automatically turns em into webp.
GitHub technically supports pasting images directly into the markdown file, but it uploads the image to it’s own servers and thus can only be seen on their website, not the published one. Bummer. The advanced way of editing these docs via VSCode allows for fast copy pasting directly into the .md, which is what I am using to write this.
Creating a New page
Making a new page is largely the same. Click “Create child page” up at the top right of any page - that will send you to a new GitHub edit page.
Experts Only!
Alright, you are a cool hacker elite and want to edit the site the advanced way? You can grab all the files off github, download the whole repo, and use something like Visual Studio Code to manage source control and make edits. I’ve made a blog post about this process for some of my other sites. I’ll have to see if this works with external accounts.
You’ll also need Hugo to preview the site locally.
Honestly, I don’t recommend doing all this if all you wanna do is edit a page now and again, but if you are doing heavy editing this is the way to go.